10 Holiday Gift Wrap Ideas

'Tis the season to be giving! And with that, comes the gift wrapping. Add style and personalize your presents with these decorating ideas. I'm a little last minute with my gift shopping this year so I will be sharing 10 of my favorite gift-wrapping ideas from Pinterest. I love wrapping gifts. I find it so therapeutic. I take the time to fold the corners real crisp. I take gift wrapping seriously. I used to work at Pier1 Imports and I was the cashier who could wrap any gift, any shape, any size with ease.

I will be sharing my gift wrapping techniques on Instagram so follow along to see what ideas I come up with.

Black, White, & Gold - My favorite glam color scheme. My favorite gifts have the bells hanging from them and of course the big full bows. For more gift wrapping ideas, head over to Boxwood Clippings blog.

Black and Gold gift wrap

Rustic Red and White - Mix craft paper and wrapping paper for a layered look. Mix in Christmas Clippings for a Natural touch and the person's initial for personalization. You could also add an ornament for a little more sparkle. For the tutorial visit, On Sutton Place blog.

Red and White gift wrap

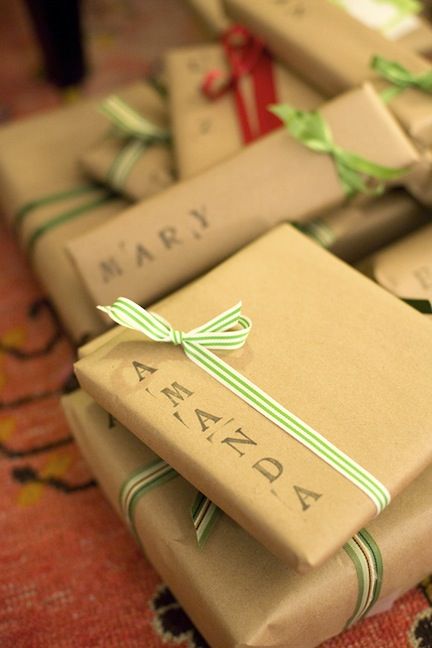
Stamp it - Personalize brown paper with alphabet stampers with each individual's name for a homemade touch or stamp some holiday cheer with the word "joy". For more gift wrapping ideas, visit Babble.com

Stamp

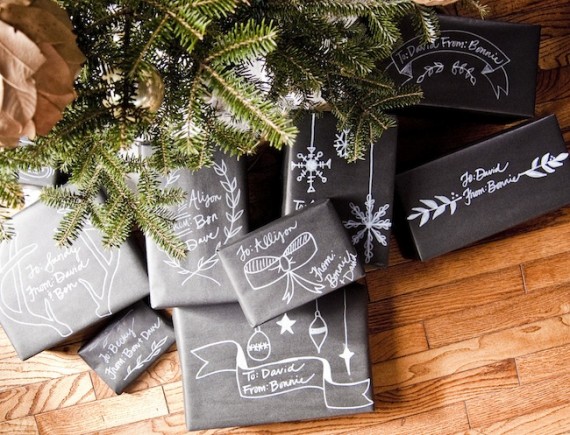
Chalkboard Packaging - Wrap your presents in black craft paper and draw with white pencil or paint pens to give the look and feel of Chalkboard presents. For the tutorial, visit Going Home to Roost blog.

Chalkboard packaging

For the Traveler - wrap your gift with a recycled map or Atlas. Bonus points for using a map with a place that actually traveled too. For the tutorial, visit Lime Doodle Design.

Map gift wrap

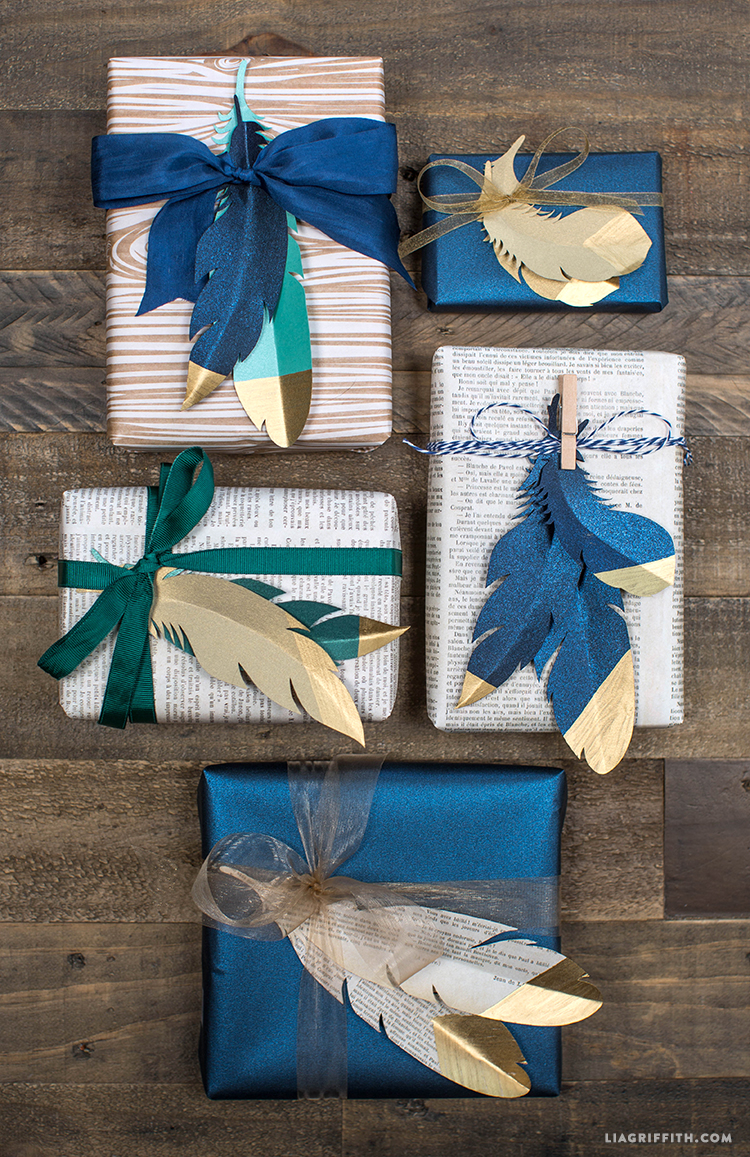
Gold Tipped Paper Feathers - No bow? No problem. Create a feather pattern out of colored construction paper or even a newspaper. Add a little glam by spraying your faux feather with gold spray paint. For the full tutorial, please visit Lia Griffith.

Gold_Dipped_Paper_Feathers

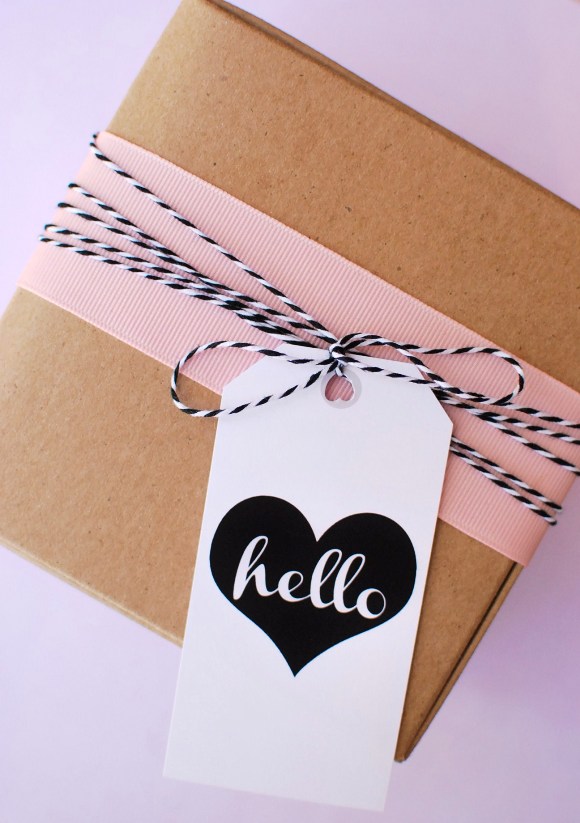
Girlie Gifts and Gift Tags - Simple yet adorable. One single ribbon for a pop of color and then black and white string to hold the decorative tag. For free graphic gift tag printables, visit Birds Party blog.

Gift Tag and Twine

Sticker it! - Cover your package with craft paper, wrap with raffia, and apply holiday stickers of your choice. For the tutorial, check out Midwest Living.

Scrapbook Stickers

Boxwood Wreath - I love boxwood plants. For a rustic yet holiday gift wrap idea, use boxwood branches and burlap. For the tutorial, visit Craftberry Bush blog.

Boxwood Wreath Gift Wrap

For the bookworm - Wrap small gifts with bookpages and add a monogram for each of your friends. I would take this gift wrap technique one step further by adding a mini candy cane or fake holly berries for a holiday touch. Tutorial via Erinnish.

Bookpage Giftwrap


Are you behind on your holiday shopping like me? These gift wrapping ideas are simple and will make your friends/family feel special when they open them. Which Holiday gift wrap idea will you choose?

Are you a gift-wrapping fanatic like I am? Tag @byamadesigns on Instagram so I can check out your holiday gifts ! I would love to see them.

Happy Holidays Everyone!

Want more design ideas? Join "The Designed Life" monthly e-magazine filled with inspiration for the home and life. Receive a free Home Design Shopping Guide as a gift when you join.

Holiday Decorating Ideas for the Home

Tis' the season to be decorating! In today's Tip Tuesday post, I will be sharing my Holiday Decorating ideas for the season. Decorating for the holidays can feel like such a task. At my house, we store all of our seasonal decorations in the attic.... so it is always a project to shlep the boxes down the stairs. We make it a family affair. Who's on the stairs reaching for the next box, who is passing down, who is opening boxes; it's an assembly line of little Italian elves. After we spent all of our efforts bringing the boxes down, who the heck still feels like decorating? If you know this feeling too well, please comment below :)

When you get a boost of energy and holiday cheer - it's time to decorate for the Holidays. Today, I will be sharing some Holiday Decorating ideas for the home.

  1. Festive Glowing Bottles: I save empty wine bottles and spray paint them or hand paint them with a design, then add ribbons, and string lights inside. Last year, I made a snowflake scene.. I used frosted spray paint and painted snowflakes on clear bottles, it looked so pretty at night on my mantle.

winter bottle

(Image via AMA Designs)

2. Faux Presents: Wrap boxes in festive wrapping paper and display in hallways or on stairs in your entry

3. Scenic Cake Stand: Create a wintery wonderland on a cake stand or under a cloche.

Scene

(Image via Common Ground)

4. Turn ordinary items into decorations with function such as turning a decorative sled into a serving platter

5. Dress up your Piano with a Holiday display

piano decor

(Image via Cherishedbliss.com)

6. Turn your desk into a wintery wonderland for some holiday cheer and inspiration while you work

7. Create a festive holiday scene on your sideboard with snow-covered trees and glass hurricane candle holders. It will create a whimsical backdrop while you dine

Glam Holiday Table

(Image via Pottery Barn)

8. Another place you can get creative with is decorating your bookcase. Display collections and hang wreaths on the front of shelves

Holiday Bookcase

9. Put statement pieces or large decor in empty corners of stair landings or on the hearth of your fireplace.

10. Add some joy to your coffee table by grouping lanterns and holiday garland. Ground the setting on decorative tray so you can be easily pick-up and move your display if you need more table space.

festive cocktail table

(Image via The Frugal Homemaker)

Hope you enjoyed this weeks design inspiration. How will you decorate your home for the holidays?

Want more design tips? Join "The Designed Life" monthly e-magazine which is filled with oodles of inspiration for the home and life. Receive a free Design Shopping Guide when you join!

Last Minute Decorating Ideas for Thanksgiving

Thanksgiving is this week and guests are coming! Is your feeling home "party" ready? In today's #tiptuesday post, I will be sharing last minute decorating ideas for Thanksgiving and tips to help prepare your home for your feast.

A Warm Welcome

Create a warm welcome by decorating your Front door and porch of your home.  Cluster vibrant mums together for a fall touch. Update your welcome mat for guests to wipe their feet before entering.

Entry

(Image via placeofmytaste.com)

Craft a Fall Wreath

Feeling extra crafty? Welcome guests into your home with a DIY festive wreath. Learn how to create your own DIY Burlap wreath (it's easier than it looks).

Fall Burlap Wreath DIY

(Image via AMA Designs)

Prep Foyer for Guests

Prepare for guests by protecting your floors with an easy to clean area rug or add a mat near the door for muddy boots and shoes. Place an umbrella stand near the door so guests know where to store wet gear when they enter. Add extra hangers to your entry closet and make room for your guests coats.

Spruce up Your Guest Bedroom

If you are hosting out-of-town guests, tidy up the guest bedroom for them to stay the night. Put warmer blankets on the bed, make sure light bulbs work in bedside lamps, and keep a nightlight in the hallway to light the way to the nearest restroom. Guests will appreciate a cozy room while they are away from home.

Guest Bedroom fall

(Image via Better Homes and Gardens)

Fall Garland Streamers

DIY some festive fall garland streamers. String fall leaves together with invisible string and hang from your dining room chandelier for a "falling leaf" centerpiece that leaves the table space open for entertaining. You can also string magnolia leaves together with a ribbon and tape them up on a blank wall to create a backdrop for picture taking (and maybe a few selfies).

Bring the Outdoors In

Fall is the last big hoorah before the cold dark winter strikes and all the leaves die off. Bring the feeling of outdoors in by filling a small vase with flowers or fall foliage. I like adding faux branches to vases because they are no maintenance and fill up tall blanks spaces. Cranberry and maple leaf branches are a homage to fall and also add fall color to your space.

Fall Entry

(Image via savorhomeblog.com)

Get the Dining Room Ready

This tip goes without saying. Prepare your dining room for entertaining by taking out the "good china" and clean the silverware and crystal stemware that has been stashed away for special occasions.

Cozy up Dining Chairs

Sometimes style outwins comfort when it comes to dining chair selections. Create a comfortable seat by adding a comfortable and stylish seat cushion with a coordinating accent back pillow. You can find seat standard seat cushions from Pier1 or Bed Bath and Beyond.

Accessorize with Autumn Colors

Update your homes decor with shades of Autumn. Cranberry, Russet, amber, golden yellows, rich brown, and forest green. Add organic elements such as cranberry branches or maple leaves for simple pops of color.

Screen Shot 2015-11-23 at 5.45.21 PM

(Image via Pottery Barn)

Display Blankets

Display blankets in a basket for guests to grab and rest after their turkey dinner. At my house, we have "nap time" in between dessert. Run to the sofa and claim your spot...

A Doggie Bag for leftovers

Last but not least, create a goodie bag for your guests to take home a treat. Everyone knows the best part about Thanksgiving is the leftovers. Share the love with your guests with packaged favors.

I hope you enjoyed this last minute tips to get your home party ready for Thanksgiving. Wishing you a holiday filled with laughter, much love, and second helpings! Cheers everyone!

Want more decorating tips? Join "The Designed Life" monthly e-magazine which is filled with inspiration for the home. Plus, receive a free gift when you sign up.

6 Ways to Decorate your Home with Things you Already Own

As I get ready to redecorate for the season, I get hit in the head with "stuff" that fell from the closet. If you find that you have collected a lot of things over the years, stick around to learn how to decorate your home with the things you already own!  Over the years, we tend to collect "stuff", some nice and some we ask ourselves "wtf did I buy this for?". However, I encourage you to head back to the archives and rummage through the items you already have, you might surprise yourself.

How to Redecorate your Home with Things you Already Own

  1. ROTATE ARTWORK: You may find artwork or photographs that have been left out of rotation for a while. Now is the time to display them and have their chance to shine. Find a blank wall in your home to hang pictures or swap out different pictures. Refresh old frames with new ones and matte pictures. I love finding new homes for my artwork and pictures.. it's like a design scavenger hunt.

Bookcase styling

(Image via My Domaine)

2. SPRUCE UP YOUR BOOK SHELVES: Refreshing your bookshelf display is a project within itself. When starting this project, it's best to start off with a clean slate (literally). Take everything down and put in a good dusting. Mix in trinkets, artwork, photos, decorative plates on stands, foliage, and other items that interest you in your bookcase. I like to rotate book orientation by placing books vertically or a short stack horizontally with an memento on top. It takes time to get it just right but adds so much more interest to your bookcase.

3. ACCESSORIZE YOUR COFFEE TABLE: Update your coffee table with a favorite book (maybe one that is too big for the shelf). Add unexpected pieces to your coffee table that add character and texture. If you own an ottoman instead of a coffee table, try adding a decorative tray for a hard surface to put drinks.

Living Room Home Decor

(Image via Elledecor.com)

5. DIY CENTERPIECE: Create a new and unique centerpiece. A centerpiece does not always have to be flowers, it can be something sculptural. It could be a grouping of glass hurricanes, a piece of driftwood, an ornate lantern, or even a sculpture to create a focal point on your table.

6. UPDATE USED FURNITURE: Update furniture that may seem out of date. Breath life to worn furniture by giving it a fresh coat of paint. Give an old chair a modern face-lift by adding a pop of color or a trendy seat cushion for a modest change that can be swapped out. Revive a chest of drawers with new decorative hardware. Add wallpaper to the back of a bookcase. Search around your home for items that are tired and that can be reinvented.

I hope you discover something in your home and make it feel brand "new" again.

Ready to take your home to the next level?

Send an email to schedule your design consultation

[contact-form to="amanda@byamadesigns@gmail.com" subject="Design Project Inquirty"][contact-field label="Name" type="name" required="1"][contact-field label="Email" type="email" required="1"][contact-field label="Tell me About your Project" type="textarea" required="1"][/contact-form]


Experiment with Color: Fall 2015 Trends

Refresh your home's color palette with warm, earthy, or saturated tones to warm up your interior during the cooler months ahead. Today I will be sharing a combination of color pairings and how to incorporate these shades into your home. I am going to break this post into personal color preferences: Neutral, Playful, and Bold .. Scroll down to the color palette that you gravitate to.

For the Neutral Lover

If you love neutral colors, try incorporated shades of "Cognac" into your home. Warm whisky browns that have a reddish tint pair well with other neutral shades. The warm autumn shade can be incorporated with wood furniture finishes and/or fabrics like the warm whiskey brown chairs featured in this eclectic living space.

Cognac Chairs

(Image via House Beautiful)

Taupe and mink brown are a great choice to use as neutral to balance any color palette. I prefer taupe over gray because it is earthy and creates a warm inviting environment when used on walls. (Love taupe so much that it is my current Fall nail color right now)

If you are searching for a muted color, try using mauve in your home. Mauve is a toned down purple that compliments well with warm browns, deep plums, and crisp whites.

Blush pinks and soft rose shades are colors that can be worked into your home. They marry well with rich blues or beiges and creams. For paint colors, select a white with a tint of flesh tone pink for a touch of warmth to a crisp white.

For a deeper neutral color and an alternative to dark brown, try experimenting with the color "Marsala". Marsala is a rich brown-red hue and also the Pantone 2015 Color of the Year. Definitely one of my favorite shades. I love how the marsala sectional grounds the space in the photo below. Read more about this color in detail.

marsala sofa

(Image via Belgian Pearls)

For the Playful and Cheery

If you like bright cheery tones, use Pantone's "misted yellow" which is a muted yellow with a green tint. It is the fall version of a cheery yellow. If you are looking for a yellow without the green tint, I like using mustard as an accent color in accessories or fabrics. Mustard marries well with rich brown, vibrant teal, charcoal gray, and even black.

Misted Yellow Bathroom

(Image via Digdigs.com)

Another cheery pop of color to try is Pantone's Amethyst Orchid. A vibrant jewel tone that is strong enough to be a statement color or can be used sparingly with accessories or flowers. Amethyst Orchid can add a lot of energy to a space when paired with red or another vibrant hue but when combined with gray it adds a soft playful pop of color.

Cypress green is a color that I am seeing more lately. I've seen it on walls, furniture, and even kitchen cabinets. Cypress is a soft soothing green but when mixed with a neutral color palette it can add a crisp pop of color. As the leaves begin to fade, shades of green can evoke a feeling of nature when added into your home. Cypress green and forest green are two shades to experiment with this winter.

For the Bold and Daring

If you are feeling daring and want to explore using saturated hues, here are a few:

Aurora red: A cross between orange and red. Reminiscent in the fall leaves. This shade is perfect for Autumn shade. Whether you use this shade in small ways or big ways, this color is bound to make a statement due to the density in color.

Pumpkin: If you aren't ready for the commitment of red, try using shades of pumpkin or a paprika spice. Burnt oranges add warmth to charcoal grays and compliment taupe or chocolate browns. In the photo below, the pumpkin hue adds warmth and color to this cozy bedroom but isn't overpowering.

Bedroom

(Image via Ericcrossinteriors.com)


Not quite blue, not quite green: Teal is a beautiful gem tone that is vibrant and mixes well with warm shades like whiskey brown. I love how the mid-century modern chair pops against the rich teal walls.

peacock blue walls

(Image via mod-home.info)

Rich violet, Sangria-like shades are rich shades that can create intimate settings when used on walls. I love seeing deep violet or cabernet-like shades in dining rooms. I feel like it creates a warm dinner setting. Whether used in a big way on walls or in smalls doses, this shade is sure to warm up any space.

So which shade will you be experimenting with this fall? Will you be going for a cheery, bold, or neutral look? Comment below :)


Want more design tips? Join "The Designed Life" monthly e-magazine, filled with tons of inspiration for the home and life. Also, receive a free Home Design Checklist to make your next shopping trip for your home easier.

Fall DIY Burlap Wreath

It's been a while since I have crafted. Since, it has been cold and rainy, I thought it was the perfect time to pick up some supplies and create an easy Fall DIY project. I'm a big fan of simple crafts that aren't time consuming yet look like a million bucks after you complete them. I made two wreaths in one hour (not bad). I made one as a gift for my grandmother's 80th birthday. I can't wait to surprise her with it.

For this project you will need:

(1) 12" Wire Wreath Frame (you can choose a bigger size but for beginners, start small)

(1) Roll of 4" wide Burlap (20 ft. Roll)

Ribbon of choice to hang wreath

Flowers and Accessories of choice to decorate

Hot Glue Gun

Fall Burlap Wreath DIY

Fall Burlap Wreath DIY

How to Create a Burlap Wreath Step by Step

  1. Preheat your glue gun before starting

  2. Tie a knot to start and to prevent the ribbon from sliding while you work

  3. Weave loops from section to section. Start from the top row and weave your way to the bottom row then weave back up to the top row until you complete the section.

  4. Continue step 2, until you weave your way all the way to the end.

  5. Tie a knot to complete

  6. If you are using fake flowers: pop the flowers off the stems

  7. Arrange your flowers on the wreath to your liking

  8. Hot glue all the accessories in place

Beginner Mistake: This was my first fall wreath DIY project. To me, 20 ft. of Burlap sounded like a lot. I thought I could make two wreaths from that one roll and but it wasn't enough because I made my wreath full. After wreath 1, I only had a couple feet leftover. For the second wreath, I used a smaller roll of burlap. I actually hot glued the loops together to hide the frame and make it look "fuller" than it actually was. I ran out of burlap at the end and "faked it" with some large flowers. Learn from my mistake, if you run out of burlap.. it's not the end of the world. Glue the loops together to hide the wire frame and use large flowers to cover gaps. Here is the finished result of the other wreath:

I hope you have enjoyed this tutorial. Please tag @byamadesigns on Instagram if you have decided to attempt this DIY project yourself! I would love to see the beautiful wreaths that you have created.

If you loved this post, please share it with a friend!

Happy crafting,

Amanda of AMA Designs & Interiors LLC.

How to Shop for Furniture

Are you ready to redecorate your space but not sure where to start? Well - I am glad your here! In today's Tip Tuesday post you will learn how to shop for furniture, how to assess your needs, what to look out for when shopping for new furniture, and how to avoid mistakes.

How to Shop for Furniture: Where to Begin

Assess Belongings - Before you go shopping, create a note of what existing items are staying, going, and what new items are needed/desired. Assess what is worth keeping and what items you are ready to let go. Also keep in mind the furniture that is in good condition but may need to be freshened up by reupholstering or refinishing with a new coat of paint.

Create a Cheat Sheet - Goto the store prepared by bring clippings of paint colors, fabrics samples, and pictures of items you are working with. Bring inspiration photos to glance at while shopping to remind you of how you want the end result to look and feel. Shopping can be overwhelming and it's easy to get distracted. Bringing a cheat sheet while shopping keeps you on target.

Plan Ahead - Measure your existing space and items that you will be keeping. Draw the general shape of your room and see if you could reconfigure the layout in a way that works best for you. Now is the time to nail down the details of what size furniture works best.

* Side Note: Measure all important doorways/entrys and hallways to confirm furniture can fit into the space. Nothing worse than buying furniture that can't fit through the door.

Scale - This ties in with measuring... A piece of furniture may look great in a showroom with high ceilings but when you bring it back home, it may overwhelm your space. Measure the space and tape out and block the furniture on the floor to make sure it fits in the room before you buy it.

Budget - Create a spending plan of how much you want to spend in total. Do not forget to factor in additional fees such as warranties, protection plans, installation/assembly, and inside deliveries.

Additional Tips:

- When purchasing upholstery, upgrade seat cushions to foam wrapped with down. Invest in pieces that are most important (i.e. the sofa) instead of rarely used items. The heavier the cushion, the longer it will last.

- Furniture is a large investment. Select furniture that is timeless and transitional.

- For case goods, look for dovetail joints in the corners of drawers for long-lasting quality.

- For upholstery, lift up a corner and shake it, if it feels light or wobbly; skip it.

Want more design tips? Join "The Designed Life" monthly e-magazine, filled with tons of inspiration for the home and life. Also, receive a free Home Design Checklist when you join.

Receive a free Designer's checklist to help you prepare for your first shopping trip. Get your free checklist, here.

DIY Thumb Print Vase

Hello everyone! It's been a while since I have posted a DIY. I have been busy creating drawings and paintings, but I haven't actually made a "craft" in a while that I could share with you.

I wanted to create a bottle that had an all-year round design, texture, and that was sculptural. So I have created a vase that  I have wrapped in Air-Dry Clay that I purchased from Michaels with a coupon. Woot woot!

Wine Bottle DIY

For this Tutorial you will Need:

- A Wine Bottle or Canister of your Choice

- Air Dry Clay (I used White so I could spray paint it if I wanted to)

- A rolling Pin

- Exact-o Knife

- Thumbs ;)

Step-by-Step Tutorial

Step 1: Select bottle

Step 2: Clean Bottles and take off labels with Hot soapy water

Step 3: Roll out Air-dry clay into a big rectangle (easier to work with). Roll out thin

Step 4: Wrap clay covering as much of the bottle as possible

Step 5: Cut off Excess clay with Exact-o Knife

Step 6: Use Excess clay to cover top of bottle

Step 7: Blend in creases with your fingers the best you can by using a rubbing or patting motion. I also rolled it on the table to even out the clay.

Step 8: Take your thumb and apply pressure to the clay to make rows of thumb prints starting at the bottom until you reach the top.

Step 9: Let clay air-dry for 24-48 hours (varies upon thickness)

Step 10: Spray paint bottle in the color of your choice and/or add branches/flowers for decoration

Here is the finished result!


IMG_2238


Want more design tips? Join "The Designed Life" monthly e-magazine, filled with tons of inspiration for the home and life. Also, receive a free Home Design Checklist to make your next shopping trip for your home easier.