Tell me if this sounds familiar: You just moved in or are looking for a new home, you started shopping around online, you made Pinterest & Houzz inspiration boards, you bookmarked all your favorite items, you watched reruns of HGTV shows, you took notes from a YouTube video on how to DIY everything, and you have been stock piling coupons for Bed Bath and Beyond like nobody's business. You did the research and you gathered inspiration but where do you start? I’m here to tell you how in this blog post!
10 Holiday Gift Wrap Ideas
'Tis the season to be giving! And with that, comes the gift wrapping. Add style and personalize your presents with these decorating ideas. I'm a little last minute with my gift shopping this year so I will be sharing 10 of my favorite gift-wrapping ideas from Pinterest. I love wrapping gifts. I find it so therapeutic. I take the time to fold the corners real crisp. I take gift wrapping seriously. I used to work at Pier1 Imports and I was the cashier who could wrap any gift, any shape, any size with ease.
I will be sharing my gift wrapping techniques on Instagram so follow along to see what ideas I come up with.
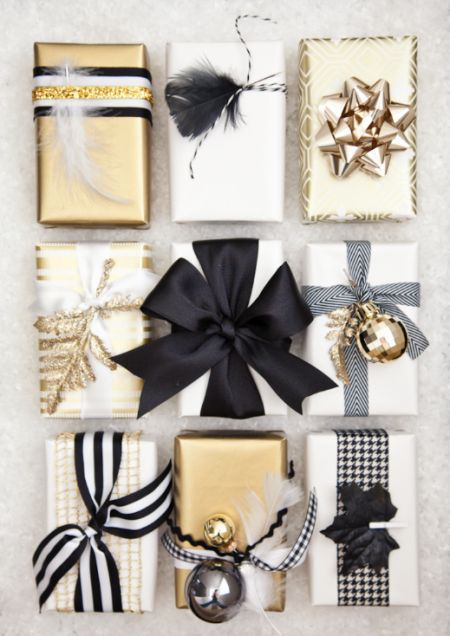
Black, White, & Gold - My favorite glam color scheme. My favorite gifts have the bells hanging from them and of course the big full bows. For more gift wrapping ideas, head over to Boxwood Clippings blog.
Rustic Red and White - Mix craft paper and wrapping paper for a layered look. Mix in Christmas Clippings for a Natural touch and the person's initial for personalization. You could also add an ornament for a little more sparkle. For the tutorial visit, On Sutton Place blog.
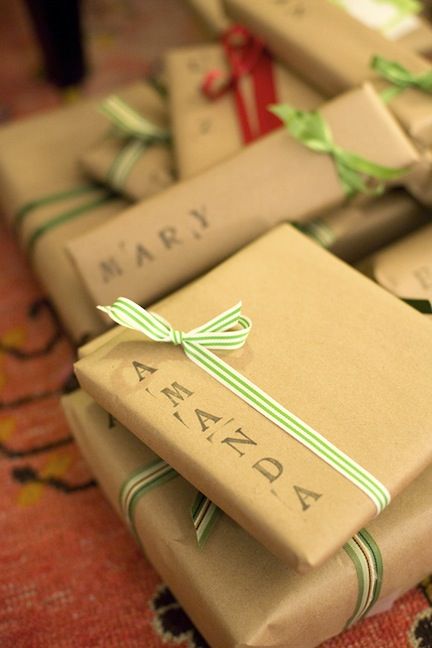
Stamp it - Personalize brown paper with alphabet stampers with each individual's name for a homemade touch or stamp some holiday cheer with the word "joy". For more gift wrapping ideas, visit Babble.com
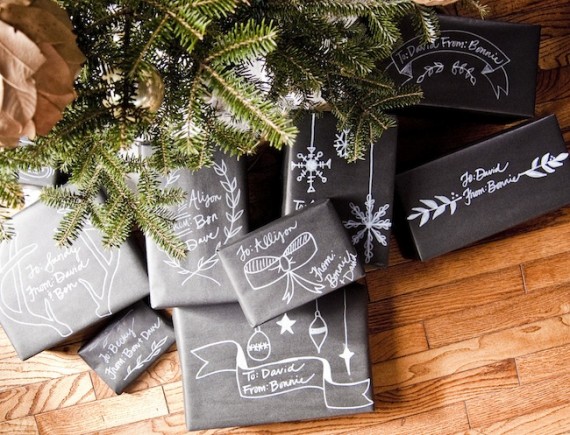
Chalkboard Packaging - Wrap your presents in black craft paper and draw with white pencil or paint pens to give the look and feel of Chalkboard presents. For the tutorial, visit Going Home to Roost blog.
For the Traveler - wrap your gift with a recycled map or Atlas. Bonus points for using a map with a place that actually traveled too. For the tutorial, visit Lime Doodle Design.
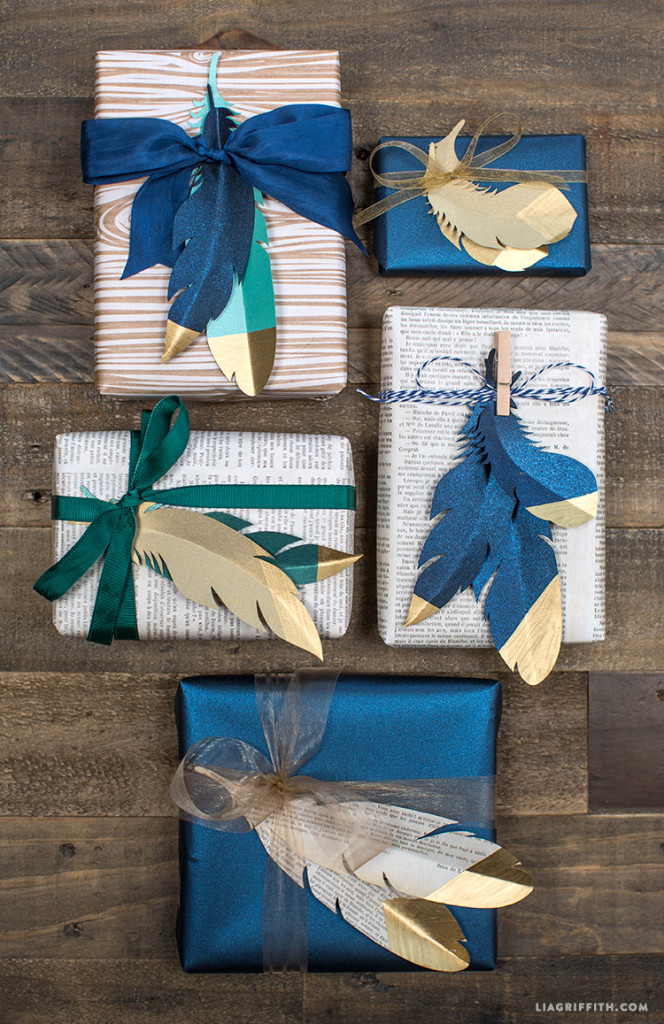
Gold Tipped Paper Feathers - No bow? No problem. Create a feather pattern out of colored construction paper or even a newspaper. Add a little glam by spraying your faux feather with gold spray paint. For the full tutorial, please visit Lia Griffith.
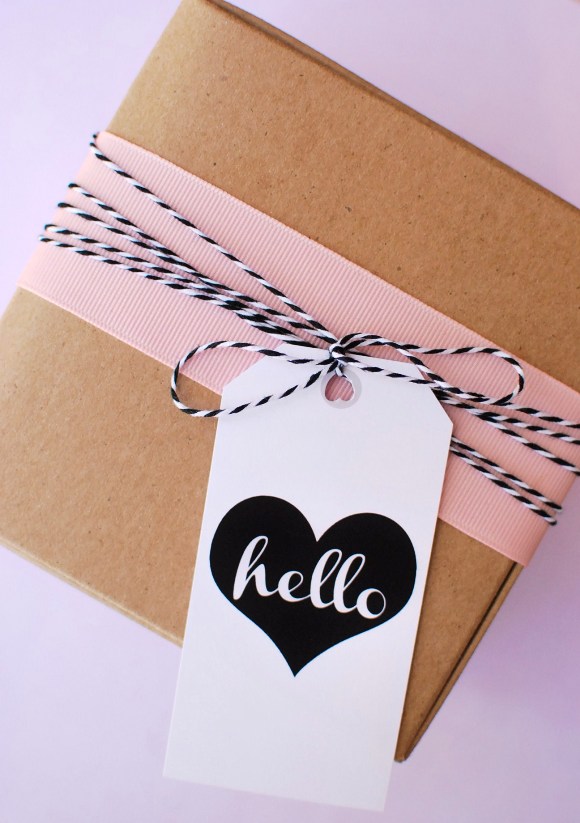
Girlie Gifts and Gift Tags - Simple yet adorable. One single ribbon for a pop of color and then black and white string to hold the decorative tag. For free graphic gift tag printables, visit Birds Party blog.
Sticker it! - Cover your package with craft paper, wrap with raffia, and apply holiday stickers of your choice. For the tutorial, check out Midwest Living.
Boxwood Wreath - I love boxwood plants. For a rustic yet holiday gift wrap idea, use boxwood branches and burlap. For the tutorial, visit Craftberry Bush blog.
For the bookworm - Wrap small gifts with bookpages and add a monogram for each of your friends. I would take this gift wrap technique one step further by adding a mini candy cane or fake holly berries for a holiday touch. Tutorial via Erinnish.
Are you behind on your holiday shopping like me? These gift wrapping ideas are simple and will make your friends/family feel special when they open them. Which Holiday gift wrap idea will you choose?
Are you a gift-wrapping fanatic like I am? Tag @byamadesigns on Instagram so I can check out your holiday gifts ! I would love to see them.
Happy Holidays Everyone!
Want more design ideas? Join "The Designed Life" monthly e-magazine filled with inspiration for the home and life. Receive a free Home Design Shopping Guide as a gift when you join.
Experiment with Color: Fall 2015 Trends
Refresh your home's color palette with warm, earthy, or saturated tones to warm up your interior during the cooler months ahead. Today I will be sharing a combination of color pairings and how to incorporate these shades into your home. I am going to break this post into personal color preferences: Neutral, Playful, and Bold .. Scroll down to the color palette that you gravitate to.
For the Neutral Lover
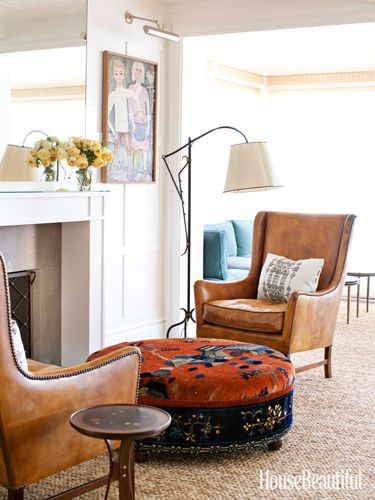
If you love neutral colors, try incorporated shades of "Cognac" into your home. Warm whisky browns that have a reddish tint pair well with other neutral shades. The warm autumn shade can be incorporated with wood furniture finishes and/or fabrics like the warm whiskey brown chairs featured in this eclectic living space.
(Image via House Beautiful)
Taupe and mink brown are a great choice to use as neutral to balance any color palette. I prefer taupe over gray because it is earthy and creates a warm inviting environment when used on walls. (Love taupe so much that it is my current Fall nail color right now)
If you are searching for a muted color, try using mauve in your home. Mauve is a toned down purple that compliments well with warm browns, deep plums, and crisp whites.
Blush pinks and soft rose shades are colors that can be worked into your home. They marry well with rich blues or beiges and creams. For paint colors, select a white with a tint of flesh tone pink for a touch of warmth to a crisp white.
For a deeper neutral color and an alternative to dark brown, try experimenting with the color "Marsala". Marsala is a rich brown-red hue and also the Pantone 2015 Color of the Year. Definitely one of my favorite shades. I love how the marsala sectional grounds the space in the photo below. Read more about this color in detail.
(Image via Belgian Pearls)
For the Playful and Cheery
If you like bright cheery tones, use Pantone's "misted yellow" which is a muted yellow with a green tint. It is the fall version of a cheery yellow. If you are looking for a yellow without the green tint, I like using mustard as an accent color in accessories or fabrics. Mustard marries well with rich brown, vibrant teal, charcoal gray, and even black.
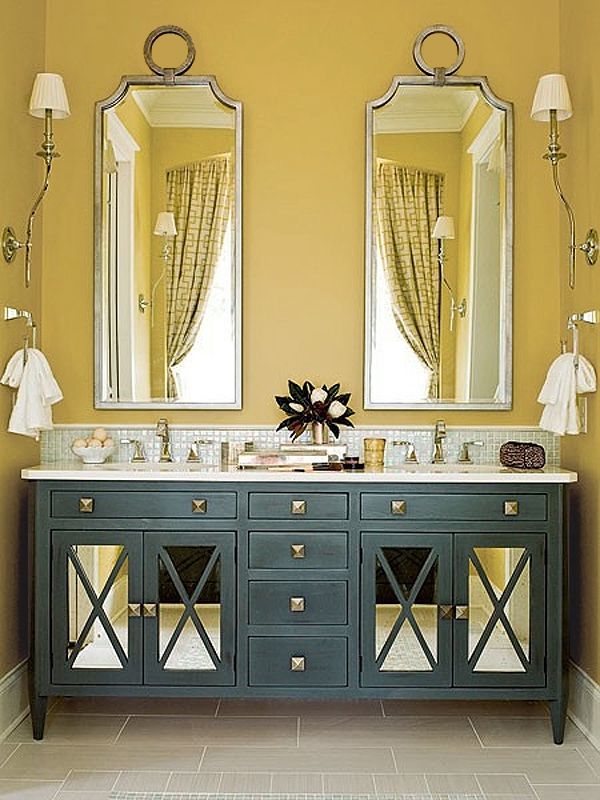
(Image via Digdigs.com)
Another cheery pop of color to try is Pantone's Amethyst Orchid. A vibrant jewel tone that is strong enough to be a statement color or can be used sparingly with accessories or flowers. Amethyst Orchid can add a lot of energy to a space when paired with red or another vibrant hue but when combined with gray it adds a soft playful pop of color.
Cypress green is a color that I am seeing more lately. I've seen it on walls, furniture, and even kitchen cabinets. Cypress is a soft soothing green but when mixed with a neutral color palette it can add a crisp pop of color. As the leaves begin to fade, shades of green can evoke a feeling of nature when added into your home. Cypress green and forest green are two shades to experiment with this winter.
For the Bold and Daring
If you are feeling daring and want to explore using saturated hues, here are a few:
Aurora red: A cross between orange and red. Reminiscent in the fall leaves. This shade is perfect for Autumn shade. Whether you use this shade in small ways or big ways, this color is bound to make a statement due to the density in color.
Pumpkin: If you aren't ready for the commitment of red, try using shades of pumpkin or a paprika spice. Burnt oranges add warmth to charcoal grays and compliment taupe or chocolate browns. In the photo below, the pumpkin hue adds warmth and color to this cozy bedroom but isn't overpowering.
(Image via Ericcrossinteriors.com)
Not quite blue, not quite green: Teal is a beautiful gem tone that is vibrant and mixes well with warm shades like whiskey brown. I love how the mid-century modern chair pops against the rich teal walls.
(Image via mod-home.info)
Rich violet, Sangria-like shades are rich shades that can create intimate settings when used on walls. I love seeing deep violet or cabernet-like shades in dining rooms. I feel like it creates a warm dinner setting. Whether used in a big way on walls or in smalls doses, this shade is sure to warm up any space.
So which shade will you be experimenting with this fall? Will you be going for a cheery, bold, or neutral look? Comment below :)
Want more design tips? Join "The Designed Life" monthly e-magazine, filled with tons of inspiration for the home and life. Also, receive a free Home Design Checklist to make your next shopping trip for your home easier.
How to Shop for Furniture
Are you ready to redecorate your space but not sure where to start? Well - I am glad your here! In today's Tip Tuesday post you will learn how to shop for furniture, how to assess your needs, what to look out for when shopping for new furniture, and how to avoid mistakes.
How to Shop for Furniture: Where to Begin
Assess Belongings - Before you go shopping, create a note of what existing items are staying, going, and what new items are needed/desired. Assess what is worth keeping and what items you are ready to let go. Also keep in mind the furniture that is in good condition but may need to be freshened up by reupholstering or refinishing with a new coat of paint.
Create a Cheat Sheet - Goto the store prepared by bring clippings of paint colors, fabrics samples, and pictures of items you are working with. Bring inspiration photos to glance at while shopping to remind you of how you want the end result to look and feel. Shopping can be overwhelming and it's easy to get distracted. Bringing a cheat sheet while shopping keeps you on target.
Plan Ahead - Measure your existing space and items that you will be keeping. Draw the general shape of your room and see if you could reconfigure the layout in a way that works best for you. Now is the time to nail down the details of what size furniture works best.
* Side Note: Measure all important doorways/entrys and hallways to confirm furniture can fit into the space. Nothing worse than buying furniture that can't fit through the door.
Scale - This ties in with measuring... A piece of furniture may look great in a showroom with high ceilings but when you bring it back home, it may overwhelm your space. Measure the space and tape out and block the furniture on the floor to make sure it fits in the room before you buy it.
Budget - Create a spending plan of how much you want to spend in total. Do not forget to factor in additional fees such as warranties, protection plans, installation/assembly, and inside deliveries.
Additional Tips:
- When purchasing upholstery, upgrade seat cushions to foam wrapped with down. Invest in pieces that are most important (i.e. the sofa) instead of rarely used items. The heavier the cushion, the longer it will last.
- Furniture is a large investment. Select furniture that is timeless and transitional.
- For case goods, look for dovetail joints in the corners of drawers for long-lasting quality.
- For upholstery, lift up a corner and shake it, if it feels light or wobbly; skip it.
Want more design tips? Join "The Designed Life" monthly e-magazine, filled with tons of inspiration for the home and life. Also, receive a free Home Design Checklist when you join.
Receive a free Designer's checklist to help you prepare for your first shopping trip. Get your free checklist, here.
DIY Thumb Print Vase
Hello everyone! It's been a while since I have posted a DIY. I have been busy creating drawings and paintings, but I haven't actually made a "craft" in a while that I could share with you.
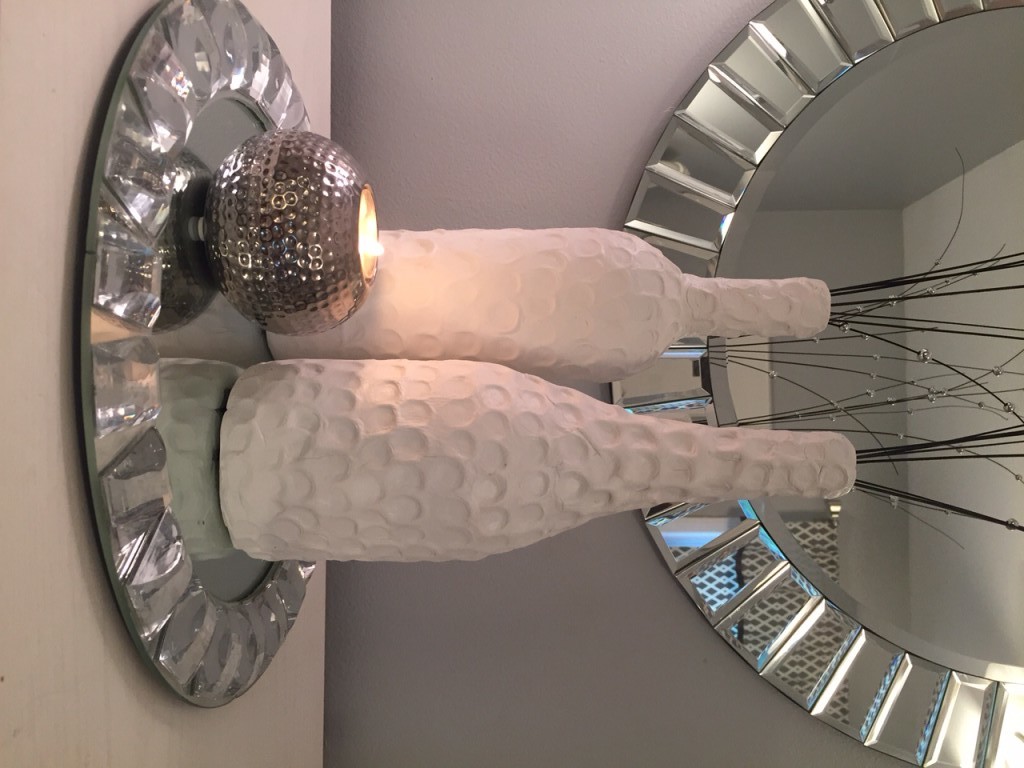
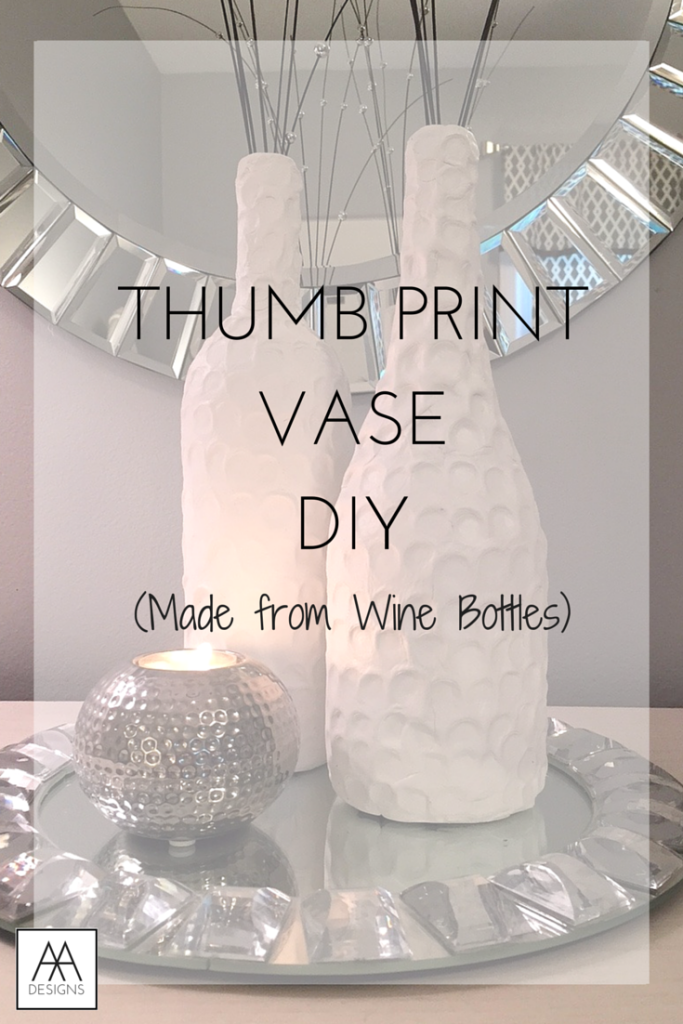
I wanted to create a bottle that had an all-year round design, texture, and that was sculptural. So I have created a vase that I have wrapped in Air-Dry Clay that I purchased from Michaels with a coupon. Woot woot!
For this Tutorial you will Need:
- A Wine Bottle or Canister of your Choice
- Air Dry Clay (I used White so I could spray paint it if I wanted to)
- A rolling Pin
- Exact-o Knife
- Thumbs ;)
Step-by-Step Tutorial
Step 1: Select bottle
Step 2: Clean Bottles and take off labels with Hot soapy water
Step 3: Roll out Air-dry clay into a big rectangle (easier to work with). Roll out thin
Step 4: Wrap clay covering as much of the bottle as possible
Step 5: Cut off Excess clay with Exact-o Knife
Step 6: Use Excess clay to cover top of bottle
Step 7: Blend in creases with your fingers the best you can by using a rubbing or patting motion. I also rolled it on the table to even out the clay.
Step 8: Take your thumb and apply pressure to the clay to make rows of thumb prints starting at the bottom until you reach the top.
Step 9: Let clay air-dry for 24-48 hours (varies upon thickness)
Step 10: Spray paint bottle in the color of your choice and/or add branches/flowers for decoration
Here is the finished result!
Want more design tips? Join "The Designed Life" monthly e-magazine, filled with tons of inspiration for the home and life. Also, receive a free Home Design Checklist to make your next shopping trip for your home easier.
Design Trend: Blue Hues in Home Decor
Boy oh boy, do I have the case of the blues (not the boo-hoo blues)!! Shades of blue were introduced at High Point Market this Spring. In the fashion industry, Pantone may have announced "Marsala" to be the fashion color of the year but blue is the color of the year in furniture, accessories, and home decor as well. Today I will be sharing my inspiration and home decor in bright blues that you can add to your home and reinvent your space.

If you follow me on Instagram, I shared my inspiration of a vignette with vibrant blue plantation shutters and moroccan tile around it. Pigmented blue hues ranging from royal to indigo to watery azure are trending for this season on the runway and in home decor.
Introduce shades of blue to any decorating palette in doses or as the main focus. Blue plays well off of primary colors such as yellow or red for a bold impact. Pair blue with orange for a energetic color combo. On the contrary, couple blue hues with purple or green for soothing and cool palette. Blue could also serve as an accent color when paired with neutrals like the room featured below.
 (Photo via 6th Street Design School)
Whether you choose to add vibrant blue tones in big way or subtle way, I have found a few options that will suit your decor needs. Here are some blue decor ideas that you can incorporate into your home.
1. Silk Pillow // 2. Cobalt Table Lamp // 3. Porcelain Chinoiserie Vase // 4. Indigo Scarf // 5. Tufted Sofa // 6. Botanical Watercolor Art // 7. Hall Chest // 8. Ikat Rug
Did you find something you liked? Pin this image to your Pinterest board so you can shop later. Are you following me on Pinterest? Let's be friends :)
http://pinterest.com/byamadesigns/
For current photos of my work and progress photos, follow AMA Designs on Facebook or Instagram.
Want more design tips? Join "The Designed Life" monthly e-magazine, filled with tons of inspiration for the home and life. Also, receive a free Home Design Checklist to make your next shopping trip for your home easier.
How to Prepare for Spring
As we make the slow transition into Spring, we naturally turn our attention to cleaning and updating our homes. This is the time where I flip my home inside out and upside down for a major cleanse. To help prepare you for the always-busy months ahead, I've created a Spring Cleaning Checklist to use as a guide:
- Purge Closets - Separate your items into piles as you pack away winter clothes. Donate or toss the items that you will no longer need or will not wear next season.
- Organize - It's time to tidy-up. Store toys in storage baskets/bins. Keep your desk neat with drawer organizers and file storage. Add hooks near the front door to hang those easy-to-lose keys. Find a home for everything to make life easier.
- Office Update - Freshen up your work environment by organizing your files, archiving old files, and even deleting unwanted files on your computer. Organize receipts by store so you can easily find them later. Shred paperwork that has personal information on it. Invest in a planner or other stationary, that you can use to jot down ideas and To Do items.
- Living Update - Your family/living room is very active. To preserve your furniture longer, flip and rotate seat cushions so they can wear evenly. Don't forget to fluff back pillows too! If your throw pillows have seen better days but the casings are in good condition, consider purchasing new pillow inserts.
- Clean Window Treatments - Remove dust from blinds and wash curtains to breath easily this Spring. Don't forget to clean screens daily during high pollen weeks.
- New Bed Linens - Revive your bed with new bed linens and sheets. Swap out your winter-weight duvet with a light-weight comforter or quilt.
- Fresh Scent - Enjoy walking into your space with a fresh scent. There is something about a nice smelling candle that instantly makes a room feel clean (doesn't mean you can skip cleaning tho!). Use reed-diffusers or display potpourri in a decorative bowl.
- Replace Doormats - Your door mat took a beating this winter. Freshen up your entry with a new door mat or hallway runner.
- Revive Exterior - Power wash the siding on the exterior of your home to remove winter debris.
- Prep Outdoor Spaces - Don't get stuck cleaning your porch the day of your first BBQ. Prep and clean your patio and outdoor furniture now to enjoy all season long. You will be happy that you did!
- Outdoor Entertaining Items - Keep your outdoor dishes and utensils near your outdoor dining set or where you prepare meals so you can serve guests with ease. Stop yourself from running in and out of the house during a party by storing entertaining items in a convenient place.
I hope you have found these tips helpful while you prepare for Spring.
What are some tasks that help you prepare for the warm months ahead? Share your favorite tip below.
Do you love AMA Designs? Want more design tips? Join "The Designed Life" monthly e-magazine, filled with tons of inspiration for the home and life. Also, receive a free Home Design Checklist to make your next shopping trip for your home easier.
10 Step Guide to Create an Outdoor Sanctuary
With the warm summer months approaching, It's almost that time to start prepping your outdoor spaces to entertain family and friends. If you follow me on Facebook, you may have noticed a few outdoor-related posts I shared. I'm in the outdoor-entertaining spirit! Easter is around the corner and I am hoping it's warm enough to eat outside or pull up a chair in the sun with a drink. Your backyard is an extension of your home that should not be undervalued. Today, I'll be sharing how to create an outdoor space that everyone will want to enjoy with 10 easy decorating ideas and techniques.
1. Divide Backyard into Zones - Dining area, lounge area, grilling/barbecue section, outdoor bar, kids play area, etc.
(Photo by Helen Green Design)
2. Outdoor Lighting - Treat outdoor spaces such as porches, patios, and even screened in porches as another room. Add ceiling fixtures as you would with an indoor space. This makes the space feel more like a "room".
(Photo via House Beautiful)
3. Outdoor Furniture - Most indoor/outdoor furniture today is hard to decipher from regular interior use. Wicker seating and sectionals make for great seating whether it be outdoor or on a screened-in porch.
4. Area Rugs - Area rugs not only define seating zones but they also protect bare feet from burning on a sunny porch (I'm guilty for this one!). Pick up a durable indoor/outdoor rug. Some examples are sisal/jute, poly blends, or even woven plastic that looks like straw.
5. Outdoor Pillows - As with furniture, indoor/outdoor fabric options have improved. Outdoor pillows don't look like your typical outdoor pillows anymore. Cozy up your lounge chairs and seating areas with decorative throws.
6. Outdoor Curtains - This ties in with #5. If you have a porch or a pergola, consider adding curtain sheers.
(Photo via Centsational Girl)
7. Light the Way - Light up paths for you and your guests with solar powered lights.
8. Discrete Outdoor Speakers - What is a party without a little music? Discretely hide speakers with speakers that are disguised as rocks.
9. Fresh Paint - Revive your deck or stairs with a fresh coat of paint. Are the high-traffic areas worn out? Consider using a stencil to paint a runner up your stairs or stencil a faux area rug underneath outdoor seating. The picture below is painted concrete. The pattern is intricate but I hope it has inspired you to try something new (even if it is a simple stair runner stencil).
(Photo via Lifeworkmediablog)
10. Storage - Create storage areas for common items. For example, if you have a pool, hang hooks near for towels or keep a cedar trunk filled with clean towels so your kids don't walk in the house dripping wet. If you have outdoor plates and glass ware, consider adding a shelf near the door that exits to your backyard. If your guests, need an extra cup or napkin, they know where to go. I love to entertain but sometimes I'm not always available to tend to everyones needs (especially for large parties). Think of the different types of outdoor entertaining you like to have and alter your storage to your needs. It makes entertaining much easier!
I hope you have enjoyed this post and it has inspired you to create your own outdoor sanctuary. Create beautiful memories outdoor this season!
Want more design tips? Join "The Designed Life" monthly e-magazine, filled with tons of inspiration for the home and life. Also, receive a free Home Design Checklist to make your next shopping trip for your home easier.


